Monday, March 26, 2012

BYS Through the Looking Glass

  Since my last post was all about fire and gold and THE HUNGER GAMESS, I thought it would be nice to show an icy kind of color. Just to mellow everything out. So here's BYS Through the Looking Glass, which I won in a Bec's Beauty Buzz giveaway. 

Through the Looking Glass is a bunch of small sapphire blue hex glitter interspersed with even smaller gold glitter bits, all in a clear base. 

Sunlight, no flash.

Ottlite, no flash.

Sunlight, no flash.
This picture is probably the closest to what this looks like in real life. 

Sunlight, no flash.

Sunlight, no flash. 

     I really like Through the Looking Glass. The blue glitter is so richly colored, and the pops of gold glitter in there are so gorgeous and look super luxe. It's not quite as sparkly as my beloved Absolutely Alice, but with AA being so rare and Through the Looking Glass having such a similar color scheme, I'm happy to have an alternative polish to use when I get the urge to wear it.
   Applying Through the Looking Glass was pretty much trauma free. I used a thin layer of China Glaze Blue Sparrow as a base, so I could conserve polish, and then put two layers of Through the Looking Glass on top.  After two coats, there were no naked patches, so I just added a layer of topcoat to make the glitter smooth and that was that. The whole thing dried really fast and was quite beautiful, yea verily.

But that's all from me today! Thanks for reading, and have a happy Monday! ^_^

Saturday, March 24, 2012

Hunger Games Stuff!!

      Hi guys!!
So yesterday, I got to go see The Hunger Games in IMAX, and it was a super-glorious experience. Like all film adaptions, it didn't quite match up to what I expected from reading the book, but I really did enjoy it. Except for in Effie's case, I think they could have been a little more creative with the makeup and wardrobe, I wish they had paid closer attention to detail (they forgot President Snow's rose a few times for example), and I wish they had stayed truer to the book because they cut out some parts that I felt were important, but despite those quibbles, it was definitely worth seeing.


Also, I was really pleasantly surprised by Peeta! When I heard who was playing him, I was like no no no nooo this shit is not going to work. But Josh Hutcherson did a really good job...once he started acting, I forgot my complaints and started being able to root for him the way that I did when I was reading his character in the books, so that was a relief. Nothing is worse than watching a movie and having this one character ruin it for you LOL. But enough blabbing about the movie...I don't want to spoil it for others. I will just say that it was great, and if you are still on the fence about seeing it, I think you should do it. I'm sure you won't be disappointed.


But anyway, for this momentous occasion, I of course had to do a girl on fire mani. I suck at free-handing or making nice-looking flames (I know because I tried), so I just did a little konad stamp-on thing.
Sunlight, no flash. 

Ottlite, no flash.
Close up of the design.


Sunlight, no flash.

    This was pretty simple to do. I did two layers of China Glaze Electrify (I'll review that by itself soon), and put a layer of topcoat. After letting it dry, I used Color Club Where's the Soiree? to stamp on a vaguely flame-y pattern from one of my random knockoff konad plates. Then, I put a red gem in the gap at the top of the flame-y pattern, sealed it all in with topcoat, and that was it. So yep, very easy. 
    I was also really happy with how it came out. The black flame-y thing pops out great against the glittery base, and the gem pops out nicely from the black. And in sunlight, the base is so sparkly that it really does look like my nails are on fire. I don't really like how the pictures look (toooo much detail lol), but in person, it's beautiful and didn't look like Beetlejuice at all for once. I was so proud of myself ahahaha. I also got compliments all day, and some people were even able to guess that I was going to see/had seen the movie that day, so that was nice. 

I also did my eye makeup like one of my favoritee characters in the whole series, Cinna. I know, I usually don't show makeup and will most likely never do it again, but I was so excited that even with my makeup ineptitude, I didn't come out looking crazy LOL. So I wanted to share. 

Here was the original look:

And this was my version:
This was also really easy. I used a thin liner brush to put some primer and then some Fyrinnae Pixie Epoxy close to my lashline. Then I used a little water and glycerin to apply Shiro Cosmetics Triforce  over the Pixie Epoxied part of my skin. On top of that, I did a thin line of Wet n Wild's Creme Eyeliner in black. Then, put some pencil liner on the inner lids, both top and bottom. The last thing I did was to curl my lashes and apply Cover Girl Lash Blast Volume. 
   I was nervous that I would look like a freak, because the gold was very bright and intense, but I actually got alot of compliments, which was nice because no one ever compliments my face lol. So yep, it was an all around good day. 

And that's all from me today! Thanks for reading and I hope everyone has an awesome weekend! And if you've seen the movie and want to talk about it, please comment! I'd love to hear what ya'll thought about it. 

Wednesday, March 21, 2012

Famous Polish Little Angel Dust

     Hi guys! So, like pretty much every other woman in the world, I was absolutely captivated by the super bright shade of blue that Beyonce wore on her nails during her first official outing after having her super-adorable baby, Blue Ivy. 


I didn't have money for Nails Inc Baker Street, but when I visited the BSS the other day, I saw this super gorgeous blue that I thought might quiet the lemmings for a while. Meet Famous Polish Little Angel Dust. I need to meet whoever named this. 


Sunlight, no flash.

Ottlite, no flash.

Sunlight, no flash.

Artificial light, no flash.

Sunlight, no flash.

       Little Angel Dust is so randomly awesome. It's a little deeper in person, but I just love how ridiculously vibrant and rich the shade of blue is. I couldn't keep my eyes off my nails while wearing this. I also loved the slick, kind of metallic finish that the shimmer brought to the polish. When I can, I will still get Baker Street because I really wanted that creme finish, but for now, I am satisfied.  
        Little Angel Dust's formula was also good. I applied it over a white to get the maximum level of brightness, and the polish covered the white in three coats, which is what I have on in the pictures. The coats went on really smoothly and dried in good time, so overall, using Little Angel Dust was a pleasure. (lol, had to do it).

If you're in the DMV area and am interested in getting Little Angel Dust, I got it from Maxim Nasia Nail Supply on E University Boulevard in Hyattsville.

And that's all from me today! Thanks for reading, and have a happy hump day! 

Friday, March 16, 2012

St. Patrick Day Greens!!

Hi guys! So tomorrow is St. Patrick's Day, and I have been wearing greens all week to celebrate. Like I've said in the past, the holiday doesn't mean anything to me personally, but I just like to indulge in it. So to get everyone in the spirit, I thought it would be fun to make some green spam.


First one is Diamond Cosmetics Never so Evergreen.


Ottlite, no flash.


Ottlite, no flash.

    Never so Evergreen is a smoky, faded hunter green, with lots of golden shimmer in it. It's really beautiful and unique, and I love how it looks on my nails. The application was also super easy...two coats of color and a layer of topcoat was all I needed for it to look perfect. 
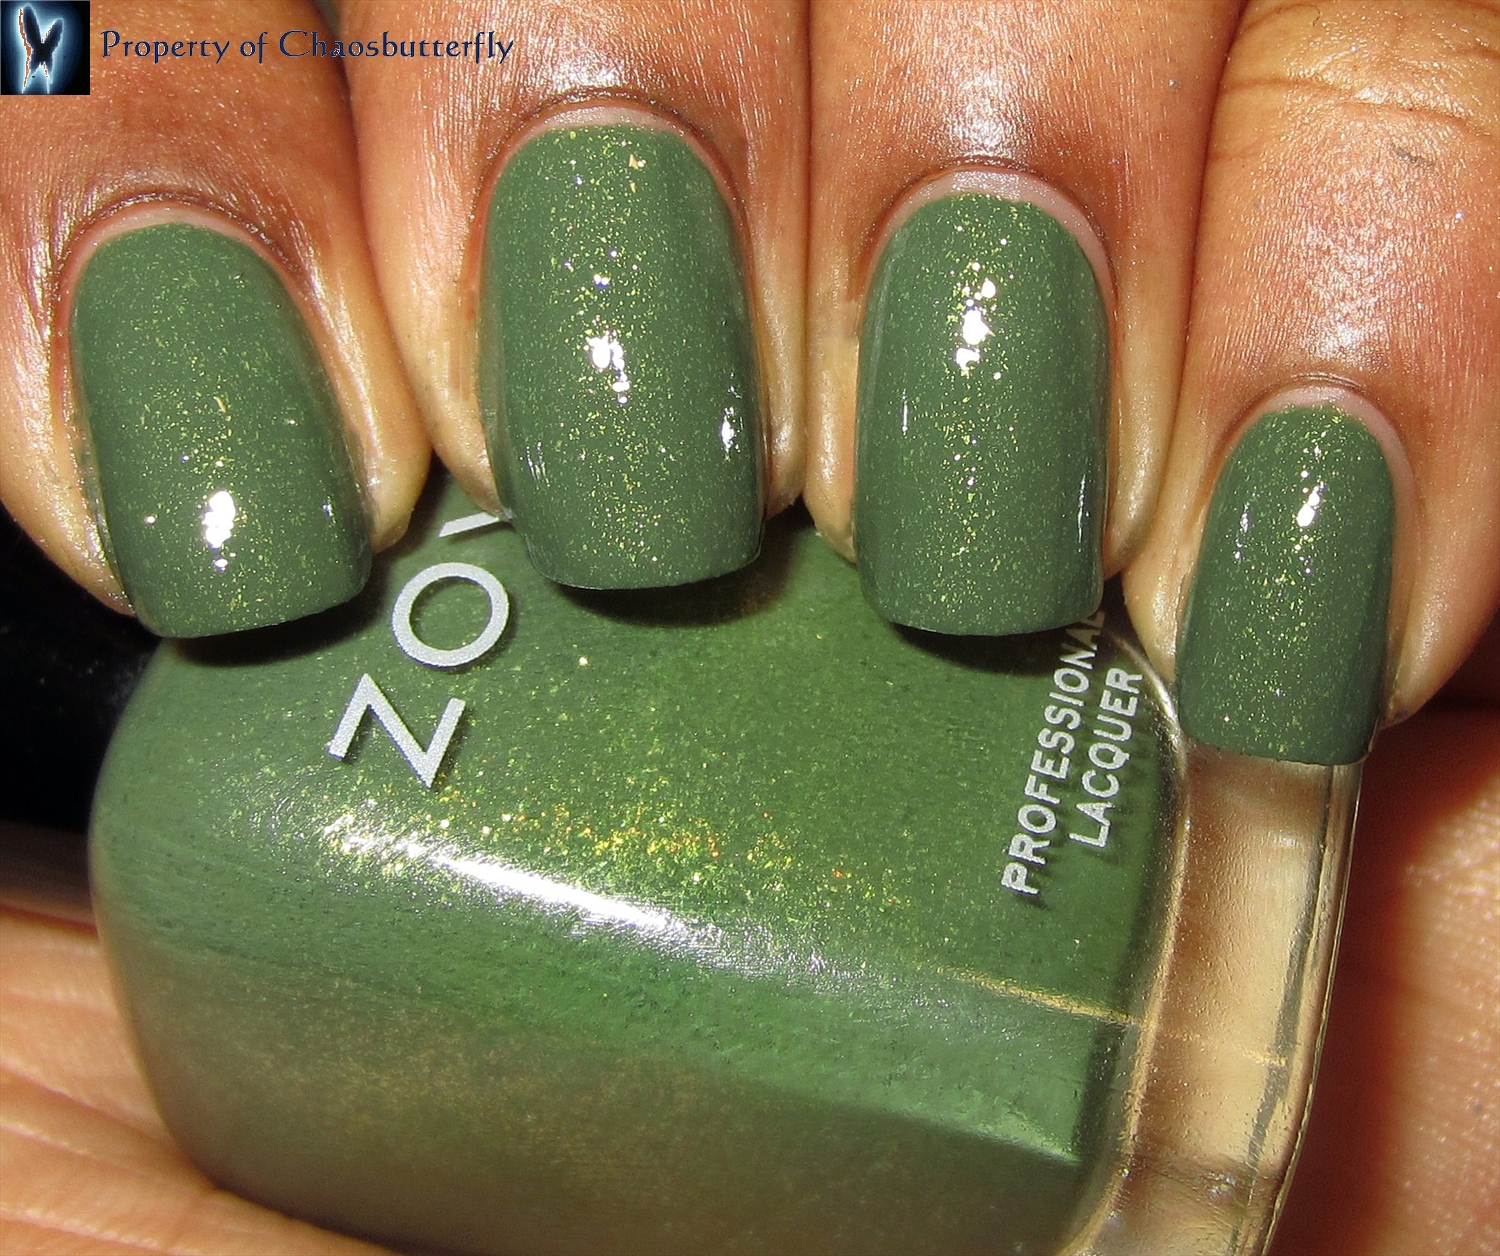
Next is Zoya Yara.


Ottlite, no flash.


Ottlite, no flash.


Artificial light, with flash.

    Yara was a weird one to capture. It's a dirty olive green with lots of grey in it, and my camera had a hard time balancing those. I guess the true color is right between the ottlite ones and the flash one. But anyway, I wasn't expecting to like Yara very much and really only bought it because it reminded me of one of my favorite queens from RuPaul's Drag Race, Yara Sofia. But when I put it on, I really did like it. The shimmer is really visible and looks great against the base, and the shade of olive itself is fairly flattering, because it doesn't have too much yellow. Formula was also really easy...I only needed two coats of color and one of topcoat. 


Next is Nina Ultra Pro Salsa!


Ottlite, no flash.


Ottlite, no flash.


Ottlite, no flash

   Salsa is a bold and slightly deep kelly green semi-jelly. The shade of green is really fun and punchy but I think my favorite part of this polish is the finish. It has the opacity and ease of application of a creme, but the jiggly quality and shine of a jelly, and with the shade of green, it makes me happy lol. It just reminds me of springtime and makes me want to skip and dance. I used three coats of polish and a layer of topcoat for the pictures, and Salsa went on pretty smoothly and easily. 


Next is OPI Damone Roberts 1968.


Artificial light, with flash.


Artificial light, with flash.
    Damone Roberts 1968 is a really smooth and creamy mint green creme. It has a good bit of grey, some brown, and a hint of yellow in there too, all of which soften it up and make it much easier to wear with my skin tone. I love how it looks kind of vintage-y but still really modern, and am so glad that I snagged a bottle when it was still available. However, application was tough on this one...I needed four layers of color to get it even and streak-free, and I had to be really careful to apply with a light hand, or there were these annoying divots. So it wasn't fun, but definitely worth all the pain in the end. 

And last, but definitely not least, is Nfu-Oh 569. 

Ottlite, no flash.

Artificial light, with flash.


Ottlite, no flash.


Ottlite, no flash.
    Nfu-Oh 569 is a blackened forest green jelly. It's known as being a dupe for NARS Zulu, which I guess is accurate, and as such, I lurvee it. It's so sexy and rich, and I love the way that it shines. Wearing it, I feel wicked, but in a good way lol. Application was also pretty easy. I used three layers of polish and a layer of topcoat, and although it kind of took a long time to dry, the polish itself went on fairly well. A little streaky on the first coat, but the next two fixed it. Incidentally, if you are in the market for Zulu, I would actually recommend picking up this one instead. You get more product for less, and Fabulous Street's shipping is much better than NARS'. 

And those are all the greens I have for ya'll today! 
Thanks for reading, and I hope everyone has an amazing St. Patrick's Day!! ^_^

Saturday, March 10, 2012

Nfu-Oh 61 + Giveaway Winners

First order of business, I finally got through the entries and have selected winners for my giveaway! The winner of Prize 1 is Tropical Chrome, and Prize 2 goes to Peripatetic 33. Congratulations to these lovely ladies, and a big thank you goes to everyone who participated! Blogging would definitely not be as fun without ya'll. ^_^


  Second order of business is to show the polish I wore all of last week. Recently, I've been craving holo polish, and after wearing a few that were on the disappointing side, I decided that it was time to bust out the big guns. So I dug into my pile of polishes that I'm saving for something special (LOL) and came up with Nfu-Oh 61. Behold! (But please excuse the chips. These were taken after a week of wear). 


Nfu-Oh 61 is a clean silver polish with a strong linear holographic effect. 

Ottlite, no flash.

Ottlite, no flash.

Sunlight, no flash.

Sunlight, no flash.

Sunlight, no flash.

Sunlight, no flash.

Sunlight, no flash.

Sunlight, no flash.

Sunlight, no flash.

       I know people are not strangers to Nfu-Oh 61, so I'm just gonna say that it's glorious, and if you love holos and are looking for a relative affordable and strong linear one, this would be it. It looks amazing all the time, even indoors, and I got a million compliments on it. This is the only one I have from their line of holos, and I think I'm going to go back and get a couple of more. Maybe the blue one. 
     I applied Nfu-Oh over Jessica Cosmetic's Aqua Base, so I didn't struggle too much with application. It was a bit tough getting it smooth, because it dries so fast and is prone to dragging. But putting a little more on the brush than you need, working quickly and lightly, and letting the polish dry fully between coats should take care of that. Incidentally, I would also recommend investing in an aqua base for this though...it really makes the holo pop and eases application. 


This is Nfu-Oh 61 without the aqua base, and even though the holo is still present and nice, it's not comparable to what showed up in the previous pictures. And it took four coats of polish to get this level of smoothness in the polish, compared to two with aqua base. So get yourself some aqua base! 

And for topcoat in the pictures, I am using Sally Hansen Hard as Nails. The holo still looks good, and for a week's time, I thought the wear was pretty good. 

And that's all from me today!! I hope everyone is having a nice Saturday, and thanks for reading!!